diy decor for christening

$2.99 FLAT RATE SHIPPING | Log in to see any saved items all wedding printables > basketball mini pennant flags beer tasting note paper all party printables > all holiday printables > FREE printables to download and enjoy from Evermine! We have a variety of free printable templates here, such as wedding printables, party printables, holiday printables and much more. And don't forget to visit our blog for additional inspiration to use with the printables above to make your occasion even more special!Shop unique and handmade items directly from creative people around the world Popular items for baptism favorsQuinceanera dresses, quinceanera decorations, quinceanera themes, quinceanera butterflies and accessories. Sign in or Create an account Under The Sea Quinceanera Roses And Flowers Quinceanera Virgen de Guadalupe Quince Party & Dama Dresses Mother of the XVanera Dresses Cake Knife Server Sets Guest Books & Pens

Cords, Trims and More Gift Boxes, Bags and Containers Signs - Small Plastic & Foam Sewing and Fabric Materials
home decor accessories dubai Favor Boxes & Bags
home & decor singapore magazine 2013 full collection Paper Quaker Baby Shower Decorations
living room furniture for sale brisbane DIY Baby Shower Centerpieces $0.00 - $23.00$23.00 - $44.00$44.00 - $66.00$66.00 - $87.00$87.00 - $109.00 Our baptism and christening decorations and party supplies include christening and baptism items for boys or girls. We also have a large selection of centerpieces and table decorations including religious items such blue and pink baptism and christening angels.

We also have a large variety of baptism and christening large and small white angels with feathers. Our colorful mini rosaries are one of our many items available for baptism party favors for your guests. We also carry a huge selection of do-it-yourself baptism and christening party favor supplies, decorations and craft supplies. 8" Clear Plastic Plates - 12 Plates #PLPL8 8.5" Angel with Feather Wings - One #FIG31 8" Angel with Sign #FM38WH 6" Sequin San Judas - One #VG12JE 8" Plastic Tortilla Holder - One #TORT1 4" Pillar - One Dozen #4PL 4” Angel Figurines #FIG289- 1 Dozen 18" Foil Balloon Mi Bautizo -One #BAL11SPK 34" Wire Boot with 16 Hooks to Hang Glasses #WR35 34" Peacock Wire Base with 16 hooks for hanging glasses #WR34 12" Star Wireframe - One #WR7 18" Plain Silver Star Balloon #BAL22SV 10.5" x 9" Wire Basket - One #BSK6 9" Sequin San Judas - One #VG11JE Sequin San Judas - One #VG10JE 6" Angel with Cross - One Angel FIG288BL

6" Angel with Cross - One Angel FIG288PK 15" Metal Eiffel Tower - One #MTTE15GD 19" Wire Carriage - One #WR18 3.5" White Praying Angel - One Dozen 11" Wire Carriage - Large #WCLRG 3" Small Angel Pillars - 1 Dozen #PLS1 6" Medium Angel Pillars - One #PLM1 12" Wire Base - One #WR6 Salt and Pepper Shakers - One Dozen #SSP 8" Plastic Toasting Cups - 12 cups #PCP3 28" Round Organza Bottle Wrapper - One #BCRBaby Showers & Gifts See our additional resource page featuring color inspiration, tips for making DIY invitations, and highlights of wedding inspiration from our blog and YouTube channel. Browse our wedding suite inspiration photos for ideas on finding the right style for you.Welcome to the first in what I plan to be a recurring “How-To” series here on Brown Eyed Baker. While recipes are all well and good, there are some techniques that are best explained in a step-by-step method, with pictures included (at least this is how I learn best).
As I was decorating my Stanley Cup Playoffs cookies last week I thought that doing a tutorial on how to decorate cookies with royal icing would be a great first How-To post. I was always very good at baking snowmen, Christmas trees, angels and the like in December, slapping on some buttercream, a few sprinkles and calling it a day. Not that it isn’t good. It is definitely good. But then royal icing came onto my radar. The possibilities seemed endless – a completely smooth finish to the cookies and intricate designs? Now THAT looked fun! I’m here to guide you on a step-by-step tutorial on how to achieve any design you want on any shape cookie. Step 1: Find a Good Sugar Cookie Recipe This might seem obvious, but not all sugar cookie recipes stand up well to heavy-duty decorating. If you don’t already have a favorite, let me point you to mine: Dorie Greenspan’s All-Occasion Sugar Cookies. Step 2: Cool Cookies Completely Again, maybe elementary, but we’re going step-by-step here.

You can’t decorate cookies that have just come out of the oven. Or even cookies that are slightly warm. They need to be completely cool before you can move on to decorating. Now, you don’t necessarily need fancy equipment for decorating with royal icing, but investing in just a few decorating tips and couplers, some disposable pastry bags and squeeze bottles will make your cookie decorating experience exponentially more pleasant. Here is a run-down of what I typically use: ♦ 12″ disposable pastry bags. So easy to just throw away when you’re done instead of washing them!For outlining the cookie I use a #3 tip and anything from a #1 to #3 for intricate designs on the cookie. It’s not a bad idea to have a few of each number, as I find myself using them a lot.These make it easy to switch the size tip you are using in the same color.I use these for flooding my cookies. Since the royal icing is very thin at this point, it’s a much neater alternative to a cut-open pastry bag.

Plus you can put the cap on and save any extra icing for next time. ♦ Small bowls or Tupperware (to color your icing) Step 4: Prep, Prep, Prep! This got me the first time I decorated with royal icing, and is especially important if you are going to be using multiple colors and different tips. I flew by the seat of my pants and ended up making a huge mess, it took twice as long as it should have, and I was trying to fish used tips out of pastry bags to re-use them somewhere else. Your plan of action: ♦ Write down how many different colors you will be using and take out that many pastry bags and couplers and prepare them. Also figure out what size decorating tips you will be using and fit them to the pastry bags. ♦ If you don’t have squeeze bottles for flooding, add additional pastry bags for however many colors you will use for flooding, in additional to the bags of that color you will use for detail work (if any). ♦ Have your icing colors ready and as many small mixing bowls (Tupperware works great for this) as you have colors planned.

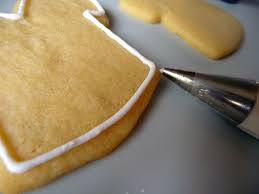
Step 5: Make the Royal Icing The recipe for royal icing is very simple: 4 cups powdered sugar 2 tablespoons meringue powder Mix all ingredients on low speed for 7-10 minutes or until the icing loses its shine. Add more water by the teaspoon if it appears too stiff. At this stage you want to be able to pipe it easily: Step 6: Color the Icing Divide the icing into your containers based on how much you will need of each one. Proceed to color the icing and then cover each container with a damp paper towel. It is key when working with royal icing not to allow it to dry out. Step 7: Outline the Cookies You will want to outline the cookies with whatever color you will be using to fill them in with. Place some of the icing into a disposable pastry bag fitted with a #3 tip and outline the outside of the cookie. I find that keeping the tip about ½-inch above the cookie while moving it allows the icing to lay on the cookie more easily. You’ll want to make sure that the outline is pretty well set before moving on to flooding the cookies, but I generally find that by the time I am done outlining the first ones are already dry.

Step 8: Flood the Cookies Take whatever color you are using to fill in the cookies and slowly start adding a few drops of water at a time, until the icing reaches an almost liquid consistency. The test here is to pick some icing up with a spoon and let it drizzle back into the bowl – the drizzle should disappear into the bowl within 10 seconds. Once you have achieved this, you are ready. Either fill a squeeze bottle with the thinned icing or transfer it to a disposable pastry bag with a ¼-inch hole cut off the end. Now squeeze in the icing to almost completely fill the inside the cookie. Then take a toothpick and gently use it to distribute the icing to any empty spots. Once you are done the cookies need to dry completely before moving on to any intricate piped designs. Some bakers will let them sit overnight but I generally find that a 2-3 hour rest will do the trick. Now use whatever colors and tips you’d like to achieve the design you want!I’d love your feedback on this post since it’s the first of its kind on Brown Eyed Baker!